• Home
  • About
  • DIY ProjectsSew With Me
  • Recipes
  • Printable's
  • Home School Adventures

Them 3 and Me!


    Is your little one learning the letter U? If so, I have the perfect activity for you! This week we are working on letter recognition with my 4-year-old and the letter is....U! I decided to do U is for umbrella. I thought to myself, how fun would it be to do an activity were she could jump in puddles? But lets be honest, as a mom, I have ENOUGH laundry to do. Activities where we mess up a bunch of clothes takes a lot of planning and mental preparation on my part lol. Considering this, plus the fact that it wasn't raining out, I decided to make these "pretend puddles" instead. 

The Set up....
I made a few different puddles with both the letter U and also other random letters from the alphabet. I drew a Starting line and a Finishing line with outdoor chalk. Next, I made a path of U's from the start line to the finish line, and then I placed the rest of the letters in random positions around the path of U's.

**Some things to note: 
  • It was kind of windy outside, so I put rocks in the four corners of each sheet of paper that the puddles were printed on.
  • I would actually suggest lamenting each puddle if you want to play the game throughout the week to reinforce the letter. Also, the lamination will make the paper heavier and less likely to be blown away with the wind.
  • Play this game on a sunny day (so not windy like I did lol) or inside to alleviate the problems with the wind.
  • The printout contains both a capital U and lower-case U. I used both of them during the game so she could work on capital and lowercase recognition. All you would have to do is print multiple pages of those letters so that you can have enough for your path.
The Game...
I gave my daughter her umbrella and told her that she could only "splash" in the puddles labeled with a U. I then told her the goal was to make it from the starting line to the finish line by only splashing in those puddles. And that was it! 

    It took her a while to get the hang of it, but by the fourth or fifth time she made it through the course like a pro! The best part is at the end of the game, she no longer had problems with recognizing the letter U, which was the goal.


If you would like to get your own copy of my U is for Umbrella Puddle Jump game. Click on the link below.

If you tried playing this game with your kiddos, comment below. We would love to hear from you! Until then, HAPPY LEARNING!


3:17 PM No comments


*Just so you know! This post contains affiliate links. If you may a purchase through clicking one of the links I may receive a small commission with no additional cost to you. Thanks!*

    We have another fun one for you today! We recently did a whole lesson on the coral reef! The girls had an awesome time learning factoids about the fish and plants that typically live in the coral reef as well as general ocean facts. Sometimes homeschool lessons can become a bit routine, so in order to break up the monotony, for this lesson we did a co-op learning day with some of the girls' friends.  Learning with friends is a great way to mix things up and it will surely add some additional fun to your next home school lesson. You don't even have to teach anything new or do an activity. Sometimes, just by having other kids take part in a daily lesson, can really make your kids day while making them that much more eager to learn.

    But let's get on with the blog so you too can start making aquariums with your little ones. When I did this lesson, I didn't jump right into making the aquariums.  Even when I do activities, I like to start off with an actual lesson first. With doing this I find that my kids are a lot more attentive because they know something fun is coming. First, we watched some fun and informational YouTube videos.  One of them taught the kids fun facts about the ocean and the other was a cool song to learn the name of the 5 oceans.  After each video I gave the kids a mini quiz to see exactly what they learned. 

    I also created a couple of worksheets to go along with the lesson.  The first was an ocean animal worksheet. In order to complete this worksheet, the kids were supposed to circle all the animals that can be found inside the ocean. The second worksheet was an ocean animal math worksheet.  My girls still need a bit more practice with simple addition, so these worked out perfectly! If you would like to get these free worksheets to add to your lesson, feel free to click the link below.

    After we got all of the learning out the way, it was on to the aquariums! This activity was pretty simple, and you can find all of your supplies at your local Walmart or on Amazon. I will say, if you have younger kids like I do, I would try to purchase some clear plastic containers like these instead of the glass mason jars. Thankfully we didn't have anything break, but I could feel myself tense up every time the kids picked up the aquariums lol.

The supplies that you will need are:

  • Glass Mason Jars (Or Plastic Jar with twist cap)
  • Aquarium Gravel
  • Bottle Water 
  • Blue Food Coloring
  • Aquarium Plants (If the plants you purchase are too tall you can always trim the tops)
  • Plastic Ocean Animals
  • Paper Bowls or Plates

     The first thing I did was prep the "ocean water". I like for my kids to be as hands on as possible when we do activities. However, they are also in kindergarten, so activities can get real messy real fast. lol So anytime I can make my life easier, I try to do that. Keeping this idea in mind, I added a couple of drops of blue food coloring into separate plastic water bottles. That way each kid could have their own bottle and fill up their mason jars independently. I would also recommend having a couple of extra bottles of water just in case. In some of the kids bottles I added a little too much food coloring. I wanted to make sure they were able to see all of their ocean animals and adding the additional water diluted some of the blue. 
    
    I gave each kid their mason jars and let them pick out their aquarium plants to place in the bottom of the jars.  I then poured the aquarium rocks into paper plates so that the kids could scoop them out and into the glass jars. It is important to make sure you add the plants first so that the aquarium rocks will help the plants stand up and keep them sturdy.


Next I let the kids pick out which ocean animals they wanted to add to their aquariums. After they placed their animals into the aquarium I gave each kid the water bottles I prepped and they poured the water into the jars.


     Once the water was in the jars, that's it! I tightened the lids, and they were done! I quizzed them again on some coral reef facts as they watched their ocean animals float around the aquarium. We ended the homeschool day by having goldfish crackers as a snack and watching Finding Neemo.

    
    All and all the girls and their friends had a blast learning new ocean facts and spending the day with their friends. Leave a comment below if you tried this activity. Let us know what other fun ocean activities you and your little ones have done!


10:43 AM 1 comments


*Just so you know! This post contains affiliate links. If you click them and purchase I may receive a small commission. Thanks!*

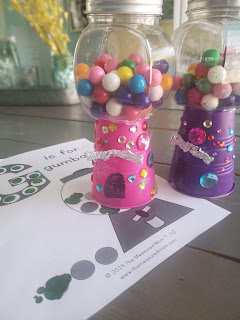
    We have a fun one for you today! This week my 4 year old is working on letter recognition and the letter of the week is G. The theme was "G is for Gumball"! We were able to play some fun learning games but the highlight of the week were these DIY Gumball machines. You may have seen many tutorials on how to create these candy dish like, faux machines, I just changed it up a bit. Even though the ones I have seen were very nice, most of them weren't kid friendly to create, ESPECIALLY for my clumsy 4- and 5-year Olds. Considering this, I decided to take the same concept and just tweaked it a bit in order to create a fantastic project fit for any little one.

    The best part about this project is that it's really cost effective, and I used a lot of supplies I already had from other homeschool projects. I really only needed to spend $3 to make it. That $3 was for the candy bowl, plastic cups and gumballs. However, we did use plenty of stickers and paint, and a couple of other supplies that I keep on hand for homeschool.  Alot of these supplies are optional, using them just made it more fun for the kiddos. If you don't already have some of these things laying around the house like I did and your kids like stickers as much as mine, the best part is, you can get EVERYTHING you need from the Dollar Tree! Here is a complete supply list for all the things that I used:

- Craft containers with lids
- Plastic cups
- Gumballs 
- Decorative stickers 
- Paint
- Paint brushes
- Sharpie 
- Aluminum Foil
- Glue gun (They don't sell this at Dollar Tree, but they do sell E6000 glue and that will work just fine. If you need a hot glue gun, I like the one below.)


And that's it! Once you gathered all your supplies, you can get started!


    First, I let my girls paint their plastic cups. Their favorite colors are pink and purple, so these color choices were a no brainer. Don't forget to 1st kid proof your painting area, painting with my kids always ends up in a mess. I would also suggest not having them paint the top of the cup (which was previously known as the bottom, until we turned them upside down). This way you can go ahead and hot glue the container to the top while it dries. It will take a minute for the cups to dry after painting, especially if your kids tend to just throw paint on in globs in certain areas, like mine.


    After they painted their cups, I set them to the side and took out the plastic containers. Just a little side note, I did wash the containers first. I would definitely recommend that since we are putting gum inside of them. I would also recommend letting them completely dry out in the inside after washing so the gumballs won't stick together.  Once I gave the girls the containers, in order to incorporate more of our homeschool lesson into the project, I had the girls practice counting objects by having them place the gumballs inside the container, counting them one-by-one.


    Once they were done, I hot glued the gum filled containers to the top (formally bottom) of the cup and set them aside to fully dry. I waited 2-3 hours for the cups to dry before we handled them again. If doing this apart of a homeschool lesson I would maybe paint one day and finish up the project the next, or you could start the project at the beginning of the day and finish it at the end, which is what we did. 


    Once everything was nice and dry, I took a small piece of aluminum foil. Bent and twisted it to try and replicate the turn dials that are on an actual gumball machine. I then hot glued it to the front of the cups. Once I finished that, I took a sharpie and drew an opening on the front to imitate where the gumballs would be dispensed on a real gumball machine. Lastly, the girls finished decorating their gumball machines with plenty of stickers. And that's it! The girls had a blast and I think they came out pretty good.


    All and all I think this project is going to be very memorable for my girls. The best part is, after completing the gumball machines my four-year-old has had no problem remembering the letter G, and at the end of the day that's what's most important. What do you guys think? Leave your comments below and let us know if you tried making these "G is for Gumball" gumball machines.


- 
9:14 AM No comments
Newer Posts
Older Posts

Labels

  • About
  • DIY Projects
  • DIY Projects-Home School
  • DIY Projects-School
  • Home School
  • Recipes

Stay Updated

About me


Hey there! My name is Chanel. I am a wife and stay at home mom of 3 beautiful girls. Our lives are full of adventures and fun. Some of my favorite things are anything DIY, basketball, watching movies and having a blast with the kiddos. Originally from the motor city, I now reside in the Atlanta area. So you could say I traded in the snow for those delicious Georgia peaches. In this blog I will take you along for the ride. Sharing helpful hints, fun activities and just everyday life events of being a full time stay at home mom. I hope you enjoy and find some of my post helpful. Cy'a soon : )

Follow Us

recent posts

Blog Archive

  • ▼  2022 (3)
    • ▼  March (2)
      • U is for Umbrella: Puddle Jump Game
      • Learning About the Ocean: Lesson Plan & Mini Aquar...
    • ►  January (1)
      • Dollar Tree $3 "G is for Gumball" Gumball Machine
  • ►  2021 (5)
    • ►  May (1)
    • ►  April (4)
Powered by Blogger.

About Me

My photo
Chanel Miller
View my complete profile

Popular Posts

  • U is for Umbrella: Puddle Jump Game
          Is your little one learning the letter U? If so, I have the perfect activity for you! This week we are working on letter recognition w...
  • Learning About the Ocean: Lesson Plan & Mini Aquarium Activity
      *Just so you know! This post contains affiliate links. If you may a purchase through clicking one of the links I may receive a small commi...
  • Dollar Tree $3 "G is for Gumball" Gumball Machine
        *Just so you know! This post contains affiliate links. If you click them and purchase I may receive a small commission. Thanks!*      We...
  • Transform Those Dated Picture Frames & Wall Art into Something Beautiful!
               Are you tired of looking at those old picture frames? Are you looking for a change but you don't want to break the bank by bu...
  • Homemade Baby Food
          I know us moms are always super busy and there are always a lot of things to balance. One of those things that can be a struggle for m...
FOLLOW ME @INSTAGRAM

Created with by ThemeXpose