• Home
  • About
  • DIY ProjectsSew With Me
  • Recipes
  • Printable's
  • Home School Adventures

Them 3 and Me!


    Inside Out is a concept I try to implement a lot. Being a stay at home mom who home schools, I spend a lot of time with my little ones. So I am always trying to figure out new and creative things to keep them occupied. As you can imagine, I spend a lot of time on Pinterest boards and Googling fun activities to keep them occupied. I am usually able to find something fun and cool to do with them, but honestly sometimes this can become time consuming and depending on the activity expensive. On those days when I don't feel like going to the store or being super creative, but I do want to do something fun with the girls, I think of "Inside Out".

    This is a super simple concept that I try to keep in mind. My girls are still really young, 3, 4 and 8 months, so they are really easy to impress. This may not work with older kids but my little ones always have a ball. All Inside Out is, if there is an activity that you would normally do in the inside of the house, do it outside. Similarly, if there is an activity that you normally do outside, do that inside the house. I know you are thinking, that is just way too simple. But honestly my kids love it! Maybe its the change of scenery or the excitement of just doing something new and different, either way I have gotten quite a few, "You are the best mom ever!", after implementing this simple strategy.

    One very easy thing is, eating outside. My kids LOVE to eat outside on nice days. I have to feed them anyway, so when we are able to, we will have out lunch outside. We will either grab a blanket and have lunch out in the yard or on the patio. I might even grab some fancy glasses or straws (my kids love to drink out of those colorful bendy straws) and then it really becomes a party! Really any slight deviation from our normal routine tends to put an exciting smile across their face.

    On rainy days, or days when its cold out I try to bring the outdoors in. We do things like play tag or hide and go seek. Its also fun to try different variations of tag. Instead of running, the girls may crawl around so that we can get my 8 month old involved. We have also did things such as leaf prints. Using items such as rocks or sticks also works well. We just simply take a small paint brush, paint the item and then we press them on either copy or construction paper, to create really cool prints.

    Sometimes it really is just this simple. It doesn't always take well planned and thought out activities to keep your children entertained. There are times when they really just have a fun time playing with the box your new dishwasher came in. lol. What I will say is, if you have those days when your creative juices aren't flowing or you just want to do something simple. Try keeping this simple concept in mind "Inside Out" and see what you come up with!

9:25 AM No comments


    I know us moms are always super busy and there are always a lot of things to balance. One of those things that can be a struggle for me is making sure my kiddos get healthy meals. Also, I like to know what is actually in the food I am giving them. Now I'm not going to lie, sometimes its just more convenient to pop some frozen nuggets, corn dogs, fries, etc. in the oven and call it lunch or dinner. However, I do try to reserve those times for when I am just extra super tired and even then I "TRY" (doesn't always happen lol) to get the "organic" or the frozen bag with the less ingredients. There is one thing though, that I pretty consistently make, and that is baby food.

    Making baby food is VERY easy to do and it doesn't take up too much time. Two very important factors when deciding to do ANYTHING when you are a mom lol. Generally when I make baby food, I try to purchase the organic frozen vegetables or I grab fresh veggies from the store. There are times though, as it was this week, when I needed to make some and I didn't have either. So I just used the regular ole frozen Peas and Carrots from Kroger. The good thing is, rather its organic or not these frozen bags usually only have one or two ingredients, and that is the vegetable itself. And honestly (even though I do try and buy organic), I am not out at the farm picking anything with these people, so really they could put anything in the bag and call it organic. But that's just me : )


     First things first, you cook the veggies. I bring some water to a boil on the top of the stove, add my vegetables and cook them until tender. I also add a little seasoning to the water but that is totally up to you if you want to do that. If I have fresh vegetables I usually steam those not boil. After my vegetables are fully cooked I strain them and place the strained liquid to the side. I then put all the vegetables in the blender. I take the liquid that I sat to the side and slowly add that liquid to the blender. Depending on the stage of my little one, dictates how much of this liquid I add. If I want a more chunky mixture I add less of it and if I want it to be more smooth I add more.


    As I mentioned before, for this meal I used peas and carrots, but you can really do this with any vegetable or fruit that you would like. The key is, how much extra liquid you add because that will determine the consistency of the end result. I will mention though, when I do fruits, such as strawberries and bananas, depending on the age of the baby I use little to no liquid. Next, after everything is nice and blended I add the baby food mixture to ice cube trays and freeze it. I do this, so that I can have perfect little serving size for baby. That way I can easily know how much food to give my little one with out wasting any extras. I also do this because I tend to do things ahead of time. I like to may make a bunch of baby food at the beginning of the week, so I can have it already ready for meals throughout the week. If I do this with fruit I usually don't freeze those meals, I just make what I will need and place it in the fridge.


    When I freeze my baby food I use breast milk bags. Since I am nursing I always have plenty of those bags at my disposal. Using these bags, I can divide the food up into serving sizes. So if my little one is eating 2 cubes of food, I put two cubes into one breast milk bag. When she is ready to eat, I defrost the food just like I would her milk. I place the bag into hot water, making sure the food is properly cooled down before I give it to her to eat. And that's it! See, I told ya! Simple and easy, and you know exactly what is in the food because you made it. And, as an added bonus you also save money. This bag of peas and carrots was only $1 and for my baby its comparable to about 4-5 jars of baby food. Saving $3 - $4 may not sound like a whole bunch of money, but it can start to add up over time.  
    Comment below if you have tried this recipe or if you have a different combination of fruits and veggies that you like to do for your little one. Another one of my favorites is baked chicken and rice. Yum! As always, thanks for reading! Be sure to follow us to stay updated on all of our new post and adventures.


8:14 AM No comments


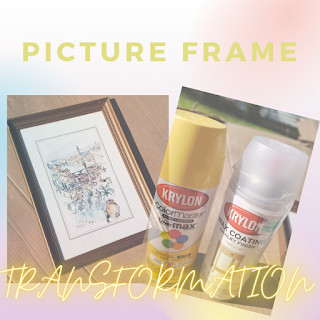
    Are you tired of looking at those old picture frames? Are you looking for a change but you don't want to break the bank by buying all new frames? I have a simple project that can give life to any of your old picture frames. For this project I actually used some old wall art that I had stored in the garage. Updating your picture frames can really bring life into a room, and when you paint them yourself you can bring in your own unique style and tie in your overall theme well.

All you need for this project is:

1. Spray Paint (Pick any two colors that work well with your design elements)

2. Sandpaper 

3. An old picture frame or wall art

4. Painters Tape (optional)

......and that's it!


    As I mentioned I used some old wall art that I had lying around.  The very first thing that I do, is take the glass and the backing off so that I have just the frame. This just makes painting easier and ensures that you don't get any unwanted paint on the glass. The only thing hiccup with using wall art instead of actual picture frames is that wall art takes a little bit more prep work since its not designed to be taken apart. The first thing I did was cut off the brown paper on the back of the piece of art. This revealed the brown cardboard backing behind the art work. Now this is IMPORTANT: If you happen to be using an old piece of art like I did, keep this piece of cardboard, as you will need something to go behind your picture when you are finished. 

    After I got through the first layer of brown paper, I had to pry up the nails located on the edges behind the cardboard. These nails hold the artwork and picture firmly in place. I just used a pair of scissors, however you can use a flat head screwdriver, even pliers. Typically these little nails or pins aren't hard to pry up. I angled mine up all the way around the frame, just enough so that I would be able to maneuver the cardboard and glass out of the back of the frame. 


GLASS REMOVAL HACK
 
    Every once and a while, depending on the size and style of the frame, even with prying the nails up, it is still hard to angle the glass enough to remove it from the frame. When this happens, I just use whatever picture came with the frame as a painting barrier. I simply place the picture on the outside of the frame in order to protect the glass. Since I am going to add my own picture later, I don't care if I get paint on it. You just have to make sure your press the edges down, and tuck them under the frame, in order to make sure all the glass is covered. Me personally, I am not a fan of painters tape. Over the years of doing different projects, I have developed a sort of steady hand when it comes to these kinds of things. However, if you want to be extra careful not to get paint on the glass, I would recommend taping the gap between the edge of the paper and the edge of the frame.


Once you have your picture frame all prepped and ready to go, ITS TIME TO PAINT!! YAY!

WHICH PAINT TO CHOSE?

Generally for most of my spray paint DIY projects I use Krylon spray paints. Unless there is a particular color or type of paint I am looking for that they don't sell. This is not to say other brands aren't good, its more like, I found something I liked so I stuck with it.  The good thing about this particular spray paint is that it works well on multiple different materials. I even painted a plastic frame. For this project I used the Color Master paint + primer spray paint in yellow. As well as the Chalky Finish in classic white. I used the yellow simply because the picture frames that I am painting are going in my dining room, and I am decorating with yellow accents.


BEFORE YOU PAINT

    Before I paint I always shake the paint can well and I do a couple of test sprays on the carboard I am working on. Spray paint can be a little tricky, if you get to close to the object that you are spraying, you can potentially spray too much paint and it can come out runny. If you are too far you may not get enough coverage on the item that you are painting. A couple test sprays help me to make sure the paint is coming out well and that I have a comfortable feel for the distance.

STARTING TO PAINT

    I start off with my yellow paint, since that is the color that I am accenting with. I always follow the directions on the can for application and drying times. Depending on the style or look you are going for will depend on how much coverage you will want to apply with this coat. I am trying to achieve a farmhouse + shabby chic look. So a lot of times I may let some of the brown underneath peek through in order to give the illusion of aging. However you may choose to go with a more cleaner look, in that case you may prefer to do a nice even coat with your first color. The choice is up to you! Let your creative juices flow!  I always make sure the front side is completely dry first, then I flip the frame over to do the backside, making sure all the edges around the frame has good coverage. I will admit though, in times past I have painted only the front of frames because that is all you can see. lol Don't judge me : )


    After my first coat is dry, I go ahead and apply the second coat. This coat is NOT an even coat. I very lightly spray the frame, purposely skipping over some areas as I spray. I am intentionally trying to allow some of that yellow (or whatever color you chose) to come through. Again, I let this second coat completely dry before I go to the next step. Be sure to always read the directions on the back of the can. This is especially important because you don't want to sand wet or partially dried paint.

   
     Once the coat of white dries I like to take a low grade sand paper and hit the edges and corners. Again, I am aiming for a shabby-chic look, so the sand paper really helps the frames achieve this look. For this project I just used what I had laying around the house, 3M advanced abrasives 220 for fine finishes. You want to make sure that what ever sand paper you use isn't too rough because you can sometimes leave scratches. You don't want that. You just want to give that aged illusion on the edges and sides of the frame.


    And that's it! You are now ready to add your pictures and hang your frames. If you are using an old piece of art work like I did, replace the cardboard backing you took out and bend the nails or pins back into place. I did a few of these frames since I am remodeling my dining room and that included adding a gallery wall. I wanted the wall to have a bit of character, so I used frames that were different in style and size, and also sanded them slightly different. I was very pleased with the results.


    I still have a ways to go on my dining room make over, as you can see its still incomplete, but as I finish a little here and a littler there, I will be sure to update you on the progress and share all of my DIY tutorials along the way. As always, thankyou for tuning into the blog! Please be sure to comment below and share your pictures if you tried this tutorial : ) 


2:05 PM 1 comments


    Does anyone have those days like me, when you just get tired of homeschooling in the house? That actually happens to me quite frequently. However with the corona virus, I now try to limit how often and where I take the girls. With that in mind, I am always trying to think of creative alternatives that gets us out of the house, but still allows us to get some learning done. My two oldest girls are 3 and 4 and they both enjoy reviewing their shapes. My 4 year old knows her shapes pretty well already however my 3 year old still needs some practice. Learning together really encourages the little one plus I find that reviewing shapes with my oldest is still good practice. 

    The shape walk is a very simple and straight forward activity. I just have the big kiddos jump in the double stroller, I strap the baby on and we hid out for a walking adventure! We don't live in a particular busy neighborhood, just your typically family area, however there are still plenty of shapes you can find. We even increase the excitement level by singing our shape song "We'errrree....going on a shape walk, a shape walk, a shape walk, we're going on a shape walk, what shapes do you see?" I know it sounds cheesy, but once we all get to singing the girls get really into it. After I ask the question "What shapes do you see?", one of the girls will say "I see a _______".  And that's it! So simple and the girls have a blast!

Here are some of the shapes that we have found!


     A Diamond!


   Rectangle and circles!


 More Rectangles and an Octagon!


   A Triangle!


More learning, more fun!

    As an extra learning bonus with my oldest, I sometimes will take this time to review counting. I will have her count all the shapes she finds and every time she finds a new shape, she gets a sticker. She then places the sticker on her sticker worksheet. Side note: I am not sure about your kids, but my children absolutely LOVES anytime they can use stickers, so I try to incorporate them when I can. This activity is great because not only is she practicing counting objects but she is also working on those fine motor skills, peeling off the stickers and placing them in the correct box. Feel free to download my Shape Walk sticker worksheet to have on your next walk.


Other Variations....

    Finding shapes can be a little frustrating for my 3 year old, so sometimes we switch it up to colors, animals or different objects like cars, trees, flags etc. The main goal that I have in mind when we do these walks is just to have fun, get some fresh air, and learn a little along the way. Try it out with your little ones and let me know how it goes!
    

6:48 PM 7 comments


    Hello All! Welcome to my blog! I am so happy that you decided to stop by. This is Them 3 & Me! Hi:) My name is Chanel and I am a stay at home mom and mother of three. This blog simply came about because I wanted to document this wonderful journey of motherhood and everything that comes with it. I figured, hey, I think we are amazing, maybe someone else will too : ) lol No, but seriously I love being a mom and coming up with new and creative ways to play with the kiddos. I plan to document all that along with all of our DIY adventures.  Being a mom, wife and homemaker isn't a glamorous gig, but it most definitely can be a fun one. I want this blog to be a place where I can give tips and get tips, post new ideas, fun projects, helpful pintables and much more. Sometimes the project may be a success, but its mom life, so I may every once in a while post a blurry picture or report an epic fail, but that's okay. I want moms and parents galore to realize "Life is NOT a Pintrest board" and sometimes things get a little messy, but that's okay. Come along on this journey with me, as I "DIY-Design" my home, homeschool the kiddos and have some exciting fun adventures. Stay tuned and I can assure you we will have a perfectly imperfect time.


3:35 PM 1 comments
Newer Posts

Labels

  • About
  • DIY Projects
  • DIY Projects-Home School
  • DIY Projects-School
  • Home School
  • Recipes

Stay Updated

About me


Hey there! My name is Chanel. I am a wife and stay at home mom of 3 beautiful girls. Our lives are full of adventures and fun. Some of my favorite things are anything DIY, basketball, watching movies and having a blast with the kiddos. Originally from the motor city, I now reside in the Atlanta area. So you could say I traded in the snow for those delicious Georgia peaches. In this blog I will take you along for the ride. Sharing helpful hints, fun activities and just everyday life events of being a full time stay at home mom. I hope you enjoy and find some of my post helpful. Cy'a soon : )

Follow Us

recent posts

Blog Archive

  • ►  2022 (3)
    • ►  March (2)
    • ►  January (1)
  • ▼  2021 (5)
    • ▼  May (1)
      • Inside Out
    • ►  April (4)
      • Homemade Baby Food
      • Transform Those Dated Picture Frames & Wall Art in...
      • Shape Walk: Lets find Shapes!
      • Welcome To the Blog!
Powered by Blogger.

About Me

My photo
Chanel Miller
View my complete profile

Popular Posts

  • U is for Umbrella: Puddle Jump Game
          Is your little one learning the letter U? If so, I have the perfect activity for you! This week we are working on letter recognition w...
  • Learning About the Ocean: Lesson Plan & Mini Aquarium Activity
      *Just so you know! This post contains affiliate links. If you may a purchase through clicking one of the links I may receive a small commi...
  • Dollar Tree $3 "G is for Gumball" Gumball Machine
        *Just so you know! This post contains affiliate links. If you click them and purchase I may receive a small commission. Thanks!*      We...
  • Transform Those Dated Picture Frames & Wall Art into Something Beautiful!
               Are you tired of looking at those old picture frames? Are you looking for a change but you don't want to break the bank by bu...
  • Homemade Baby Food
          I know us moms are always super busy and there are always a lot of things to balance. One of those things that can be a struggle for m...
FOLLOW ME @INSTAGRAM

Created with by ThemeXpose